Wednesday, February 29, 2012

My Favourite Mud Cake - gluten free


MUD CAKE

250g cold unsalted butter, chopped
150g dark chocolate, chopped

2 cups [440g] castor sugar
1 cup [250ml] water

1/3 cup [80ml] whisky
1 tablespoon dry instant coffee

1 ½ cups [225g] plain flour & ¼ cup [35g] SR flour [to make gluten free, use 1 ¾ cups gluten free flour and ¼ tsp gluten free baking powder]
¼ cup [25g] cocoa powder

2 eggs, beaten lightly

Grease 23cm swuare slab cake pan, line base with baking paper [DO NOT USE A SPRINGFORM PAN OR YOUR CAKE WILL LEAK ALL OVER YOUR OVEN – I KNOW THIS FROM EXPERIENCE].
Combine butter, chocolate, sugar, water, whisky and coffee in medium saucepan, stir over heat until butter and chocolate melt.  Transfer mixture to large bowl; cool. 

Stir in sifted flours and cocoa, then eggs; pour mixture into prepared pan. 
Bake in moderately slow oven [160 C] for 1 ¼ - 1 ½ hours.  Stand cake in pan 30 minutes; turn onto wire rack to cool. 

Serve dusted with sifted icing sugar, or ice with chocolate ganache for an even richer cake experience!
__________________________________________________________

CHOCOLATE GANACHE:           combine 200g melted dark chocolate and ½ cup cream.  Refrigerate 30 minutes till thick and spread over cake.  Decorate with chocolate curls and strawberries.


Sunday, February 26, 2012

A purple nightie for a purple-loving princess

Miss 6 [soon to be 7] is a real princess.  With the exception of her school uniform, she rarely wears anything but dresses, and nighties to bed.  Shorts are too "boy-ish" in her words.

I am often making dresses and skirts for her [and the other girls] but I have always bought their PJ's.  But it is getting increasingly difficult to find modest and/or appropriate PJ's for my girls.  They're either covered in phrases or images I don't think are age-appropriate, or are styles too grown-up for a 6 year old.

So this week I ventured into the world of jersey and sewed my first ever nightie, and for the first time I sewed jersey.  This is actually a test, but because it is purple [her favourite colour] and it has a frill and it fits her, when she tried it on she decided not to take it off!

She has put an order in for another nightie, similar in style but adorned with a rainbow of frills.  I guess that means another trip to Spotlight is in order [Yay!]. 

Thursday, February 23, 2012

He walks before me

In the busy weeks of the start of 2012 it has been difficult at times to 'be still'.  One thing is for sure, however:  God walks before me.

There have been numerous times when I have prayed, often in desperation, or worry for my sick child, or in panic.  Each time I have been answered, but not necessarily how I expected the answer to come.

Events that could have gone badly have not gone as 'bad' as they could have.  Circumstances and 'coincidences' have occurred so that the best outcomes could happen.  I have learnt more about trusting God, even when things seem to be going wrong.

I have been reminded again that every circumstance, every event, every person that I meet, all of this is forknown, prepared by God beforehand, part of his marvellous plan.

He walks before me.

Monday, February 20, 2012

my rosellas are growing


It's almost time for my rosella harvest... and rosella jam. Yummy!!


Friday, February 17, 2012

GLUTEN FREE CHOC-CHIP COOKIES

This recipe makes dozens of cookies.  I mean dozens.  The best part is, you can freeze them.  So I can always have cookies on hand for those busy weeks when I can't bake.  They're so yummy.  I have also substituted the chocolate for nuts or pressed gluten-free smarties in the top of the plain dough [the kid's favourite].  It's a brilliant basic recipe.

500g butter
1 x 395g tin condensed milk
1 cup sugar
5 cups SR flour [I use my own blend, from Betty Hagman, with added baking powder]
2-3 blocks of chocolate [white, milk or dark] roughly chopped

Preheat oven to 180 C.  Using an electric mixer, beat the butter and sugar together until light and creamy.  Beat in condensed milk.  Add the flour and mix until smooth.  Stir in the chocolate until well combined. 

Roll about 2 teaspoonfuls of the mixture into balls and place on baking paper-lined trays.  Bake for 12-15 mins or until lightly golden.  Remove from oven and cool on the trays.  Store in airtight containers.

Tuesday, February 14, 2012

Crochet hangers

My grandmother was a prolific crocheter, knitter and sewer.  She used to make crochet covered hangers by the dozen, colour-coordinated to our bedrooms.  I never really appreciated them, and over the years have given a heap away, thinking they were old-fashioned and collected dust.

I decided to learn to crochet them myself.  After scouring the internet for a pattern I came up with one that worked for me, I needed simple to begin with.  I have to say I was pleasantly surprised at how quickly and easily they came together.

If you want to make your own, and you can crochet trebles [double-crochet in US terms] then you can make these!!

Just chain 20 to begin with, and then treble crochet in the 3rd chain from the end, all the way back to the beginning.  Then turn, and treble crochet back again.  When your rectangle is as long as your hanger, slip-stitch to join at one end and along the long side of the tube, fit the hanger inside [the hook part should be sticking out where you're joining with slip-stitches] and continue slip-stitching to complete the cover.

You could then embellish by crocheting a scalloped edge or flowers along the bottom, but I was time-pressured so I have left these plain. 

Saturday, February 11, 2012

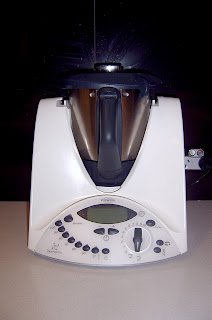
Thermomix

I did it, I bought a thermomix. After deciding I didn't need one, I saw one in action back in November and I realised this machine is like having another set of very efficient hands. Boy, do I need another pair of hands some days!

I have to say that this machine is truly amazing. I have really enjoyed running it through its paces over the past couple of weeks, and I am making foods I haven't had time to make since BC (Before Children).

It makes a great gluten free loaf of bread, the best gravies and sauces I've EVER made, steams and chops, and much more in just seconds.  It sounds very cliched but I use it many times each day.  Seriously.  I have always preferred making things from scratch.  But now I really make things from scratch... I even mill rice and buckwheat flour in it!!

It has also driven me to clean and tidy the pantry... an unexpected makes-me-smile-every-time-I-open-the pantry-doors side effect!


Wednesday, February 8, 2012

How moving a pot saved me 10 minutes a day.


I rearranged one thing on my kitchen bench recently.  I moved the pot I put the chook scraps in to a different position - over my rubbish bin.  Until now, it was located near the back door, which was logical as it helped me to remember to feed them!!  However moving the scraps pot has made each mealtime cleanup MUCH more efficient.

When I'm clearing the kid's plates, I scrape the scraps into the chook bucket, put any rubbish in the bin, and then put the plates above the dishwasher.  Before this I used to walk across the kitchen to the door, put the scraps in, walk back to the bin, then stack the plates in/near the dishwasher.  The simple act of moving the scrap pot over the bin has saved me heaps of time as I'm not walking back and forth over and over and over.

I'm now on the lookout for other things that I can move or change slightly that will improve my efficiency around our home.  I'm especially on the lookout in my sewing room.  Can you see anything that has 'always been there' that you can move a little to improve how you do things at your place?

Sunday, February 5, 2012

multi-zip pencil cases


Have you seen those pencil cases made entirely from zips?  My daughters have, and they thought that this year they would like one.  But then they informed me that those pencil cases that their friends have aren't very useful, because each zip opens into the same big pocket.  They thought it would be far better if we made pencil cases with multiple zips, each opening into a separate pocket.

So I did.

If you want to make one yourself you will need a number of zips, all the same length, and fabric cut into strips the same length, each strip 1 inch longer than the last.

Place two zips right sides together, with the smallest fabric strip behind.  Stitch together with a very narrow seam [2mm or less] using your zipper foot.

Open out the top zip, place the next fabric strip behind, and the next zip on top.


Stitch again with a very narrow seam.  Keep on repeating with zips and increasingly larger strips of fabric.

Open out and press well.  Add a narrow strip to the front of the bottom zip, and a large piece of fabric to the top zip.

The bottoms of the fabric strips will not line up, they need to be trimmed to the same length. 

Make binding or use pre-purchased binding and add to both sides and base of pencil case.

You're done.

Thursday, February 2, 2012

Gluten free pancakes and waffles

This has become my favourite pancake/pikelet/waffle mix.  I have tried countless recipes and experimented with all of them a lot over the past 5 1/2 years.  I no longer experiment.  It is my go-to recipe every time.  Mr E likes them, and he doesn't like gluten free food much.  I have even had people tell me they prefer these waffles to ones made out of wheat flour.


·        1 cup rice flour [brown or white]
·        1/2 cup potato starch
·        1/4 cup tapioca flour
·        2 teaspoons baking powder
·        2 tablespoons sugar
·        1 teaspoon salt
·        1/4 cup oil or melted butter
·        2 eggs
·        1 1/2 cups sour milk or buttermilk (I sour mine with a couple of teaspoons of vinegar)

Mix all dry ingredients together.  Add oil, eggs and milk.  Blend with a stab mixer, electric mixer, food processor, or balloon whisk.  Cook as pikelets/waffles/pancakes as desired.