Thursday, December 24, 2009

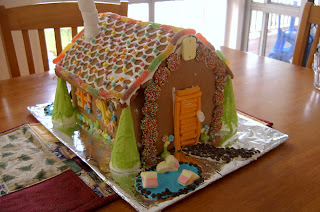
COMPLETED GLUTEN FREE GINGERBREAD HOUSE


It took a lot of patience & a couple of hours, but we finished it!! I can't tell you how many times I asked Miss 2 to go & wash her hands as she kept putting fingers in her mouth, but other than that it was a lovely experience. No begging to eat the lollies, no whining. It probably helped that they knew they could eat their little ones from yesterday as soon as we were done.


The recipe was brilliant, though it's gluten free it handled just like I remember real dough handling. It makes a very large amount, but that means you have plenty in case of mistakes or to make other gingerbread biscuits. It tastes delicious, too, not at all like many gluten free biscuits. It did soften overnight but perhaps I didn't cook the gingerbread long enough for solid walls & roof [This is the first time I've ever made a gingerbread house]. The ice-cream cone trees are doing a great job holding up the eaves that are starting to sag anyway.
The icing is royal icing, which sets really hard. You have to work fast before it sets, & keep any extra covered so it doesn't dry out & harden in the mixing bowl:
3 tablespoons dried egg white [you could also use dry pavlova egg mix]
4 cups icing sugar
approximately 1/3 cup warm water [add extra if required]

Beat all ingredients together with electric mixer until smooth & shiny. It should be the consistency of whipped cream. Thin with water if required.

I really recommend this activity to do with your children. Coming up with ways of using the lollies you give them is a great exercise in imagination. I piped the icing & let them decorate as they wanted. You can't see in the photo but this house has ducks in a pond out front & sharks in a pool out back!!

This afternoon they want to make some gingerbread people to place around the house, and perhaps some pets. But the plans keep getting even more elaborate: Miss 6 has plans for a stable complete with nativity characters & a church with steeple next year, while Miss 4 wants to create an entire gingerbread village!

Wednesday, December 23, 2009

Gluten free gingerbread houses


I'm not one to back away from a challenge, and when I realised that my 6 year old would never get to enjoy a gingerbread house because she's coeliac, I decided to rectify this. Forget the fact I've never made or eaten a gingerbread house in my life. I decided last week that one of our Christmas activities would be this.


So today that's what we did. I've been researching gingerbread houses on the net for the past couple of weeks, found a recipe I liked, changed it because I can't help myself, and dived in. We made mini ones first, which we decorated this afternoon. The large one in the background will be decorated tomorrow morning, now the girls & I have had experience decorating gingerbread houses!!


What fun we had! Even Mr E had a go. I haven't photographed his or mine, as they are the worst looking houses of the lot... we both piled as many lollies as we could on them & they look ridiculous. Makes you wonder who the real children are in this house.


CUTE REVERSIBLE APRON


I made this apron for my sister. It's fully reversible & very cute. Inspired by pictures of the Emmeline apron I've seen online but I drafted my own pattern that met sis' needs [including pockets & adjustable straps].
I can reveal it now as she has received it.

Friday, December 11, 2009

I like being organised. In fact, I feel calm & in control when I am. Which is why days like today throw me.
I always make a double batch of whatever I'm baking. I can't help it. It always seems to me that if I'm going to the effort I may as well double it, freeze one batch then save me the trouble next time. But today I decided to be 'normal' and make a single batch of cupcakes for the party we were going to.
Then the phone rang & we were invited to another birthday party in the afternoon. This one we could only pop into on the way to ballet, so I didn't worry too much. But then there was this nagging in the back of my head: Miss 6 won't be able to eat the cake [she's coeliac so I always have to take gluten free food to parties for her]. So I've just finished baking a second set of IDENTICAL cupcakes to the ones I made this morning.
Instead of folding the washing, tidying up, wrapping gifts, spending time with my girls etc. etc. I have baked TWICE today.
Next time I'll just make a double batch.

Tuesday, December 8, 2009

Too busy to think?

Do you ever lose things? I have spent the better part of this week trying to find my Mum's Christmas gift, which I'd carefully hidden somewhere in my house, then promptly forgotten about. Then today I realised I couldn't find Miss 6's skirt for the upcoming ballet concert. Also missing was a pair of pink pants, and a new pack of bobby pins. THEN I realised that her Annie shirt was also MIA.

At this point I started to panic, realising that one of two things had happened:
(1) I had imagined buying/making all the above things; or
(2) despite appearing relatively organised & my house fairly tidy it was underneath the facade a disaster

So I continued to turn my house upside down looking for the above items. I decided the only logical way to do this was to prioritise what I was looking for. Because the ballet concert is before Christmas, the costume stuff must be the first to be found, so I concentrated on my sewing table, the ever-growing ironing pile, the laundry, & several fabric/craft storage areas.

I am happy to report that while looking for the pink pants I found the bobby pins, then while looking for the skirt I found the pink pants. Starting to see a pattern appear I looked for the Annie shirt & sure enough, the skirt was revealed. So I decided to look for Mum's gift, sure that the Annie shirt would turn up. Would you believe it, after days of looking I found Mum's gift, almost in plain view.

At this point, late in the evening after several hours of tidying & sorting & hunting & looking my situation is as follows:
- I am still missing the Annie shirt
- my sewing table is a big disaster
- the floor of my rumpus is a bigger disaster
- I have a tupperware party tomorrow party in my house at 10am , ballet lessons in the afternoon & a bbq at my house in the evening. Even if I keep everyone out of these areas tomorrow I won't be able to deal with them until at least Thursday
- my sister & her husband are arriving from overseas on Saturday & need to sleep in that room
- I am still missing the Annie shirt [repeated because I'm stressed about this]
- I am relieved that I found most of the things I'd lost because it means point (1) above is untrue

It occurred to me that to be as forgetful as I am, and to lose things as often as I do [this is not an out-of-character experience for me] I must be too busy to lay down the memory trail of where I put things, ie too busy to think.

Somehow I don't think we're meant to go through life so busy that we don't think about what we're doing, or what's going on around us. I don't think we were created to miss out on living because we're too busy to lay down memory paths.

So this 'silly season' I'm going to try what I'm doing right now: sitting back & taking a breath. In the bible the Lord says "Be still & know that I am God". It's not an easy thing to do, to be still. More difficult is knowing who God is, unless you read the bible, where He reveals Himself to us.

I want to encourage you - don't miss out on any more of your life. Being too busy to recall what's happening around you & too busy to spend time with the God who created this life is no way to live. It also leads to a lot of things getting lost, in my experience.

I think I'll shut the door of the rumpus for tomorrow & enjoy my guests. The shirt will turn up [hopefully before the ballet concert].

Friday, December 4, 2009

GLUTEN FREE RISSOLES/MEATBALLS

Do you have picky eaters in your house? I do. Even when I chop onion as small as humanly possible they can find it in a mouthful of food, pull it out & say "I don't like this, why did you put onion in it?".

But I have found a solution for my home, where the adults really like onion, & the children don't: dried onion flakes. Here is my not-so-secret recipe for the most delicious meatballs/rissoles [I give this recipe out often because people always comment on how tasty they are].

Now there are no exact quantities, just rough guidelines, each time I make them they're slightly different.

Place in a bowl:
mince [I use low fat]
dried onion flakes [a teaspoon or two depending how much meat]
a splodge of tomato sauce
a dash of sweet chilli sauce
freshly ground salt & pepper
an egg to bind it together

Now put your disposable gloves on & mix it all together with your hands! Disposable gloves are essenial in any kitchen for making meatballs, cutting up yukky stuff like chicken, making pastry & stopping it getting under your fingernails etc etc.


Onion Flake on Foodista

Wednesday, December 2, 2009

More Christmas cards...


In a previous post about my last day making cards with Julie I mentioned I'd be using one design for the girls to give to their school friends. Yesterday I worked quite hard [around the school concert, dinner, & other activities] to get these done. I did have some help, but I've discovered that if you have to make 48 identical cards & you are doing them in a production line [ie all cutting first, then all the scoring, then stamping, then folding] a 2 year old gets bored very quickly, and a 4 year old quite soon after. So the help was short-lived, which made me much quicker!
I've just taped candy canes in 21 of them for Miss 4, who has stamped 'love from Miss 4' on the inside of the cover. Miss 6 can write in hers [she doesn't know that yet]. It's a lovely way of combining a card & candy cane gift in one. Although I must say I don't want to make any more for a while...

TEACHER GIFTS


Things have been quiet-ish on my blog for the last month, not because I haven't been crafting, but because I haven't FINISHED anything. My list of deadlines [eg all gifts bought & wrapped prior to Dec 1; all handmade gift finished by Nov 30] has kept me flitting from project to project.


But seeing as Miss 6 finishes school on Friday, I needed to FINISH her teacher gifts, which meant finishing Miss 4's seeing as they're all the same. I've made each teacher a bag [three here but five in total] and I'm pretty certain none of them read this blog so it's safe to show you what I've been up to.


I also got the girls to help me make cards - they have a perforation along the side [thanks, Julie!] so that part tears away into a bookmark. This is the result of our efforts.


Tuesday, December 1, 2009

my last 'cards with Julie'


Yesterday was my final card morning with Julie [see here for more info]. It seems strange to be doing my 'lasts' - it hasn't really sunk in yet that we're moving soon. These are the cards I did with her yesterday. I will miss her creativity & company. Today I have been working on 48 of the small matchbox style cards [the green one] for Misses 4 & 6 to give to their friends. But instead of a punched Santa, I'm stamping a gold Christmas tree as I would go mad if I tried to make 48 of those little guys!!
Off to finish sticking them together now...

Saturday, November 28, 2009

MAKE AN ADVENT CALENDAR


Here is a photo of the Advent Calendar the girls & I made this afternoon. Today I was somewhat prepared, which is why I'm not so stressed out compared with yesterday's card effort. It also took much less time & less clean up, surprise, surprise!

I just used my large square punch, and punched out 24 squares of coordinating paper. Then the girls stuck them to a piece of 12x12 cardstock and decorated each square with a sticker or two.

I added the numbers [to ensure we got all 24 days as Miss 4 tends to miss number 17 when counting] and Miss 2 put the larger Christmas tree sticker on a 9x9 cm square of paper. We put it up on my Everyday Display [Creative Memories magnetic display board - you could use a frame or put it on the fridge or wherever].

Then I made a little envelope by folding a piece of paper in half & sticking down each side & pegged it up on the ribbon. That's to hold the squares that we'll stick over each day.

Now, you could use coloured paper squares, X's or you could have a creative husband like me who suggested we print a photo of the family, cut it up into squares, and use that to cover each day's square! As long as we get each piece of the photo in the correct spot, it's a great idea...

If you want to reuse your calendar each year, you could stick a small magnet to the back of each photo piece [or X, or coloured square] but I think I'll just use a bit of double-sided tape...

Here is a close up [well, sort-of]:


Friday, November 27, 2009

Things I've learnt making cards with children

Yesterday afternoon I decided to be spontaneous & get the girls to help me make cards for their teachers to say thanks for this year. This is what I learned:
  1. Be prepared ahead of time [don't spend the first 5-10 minutes gathering all your supplies together as the kids get bored & into mischief VERY fast!].
  2. If you are doing paper craft of some type, have the card cut ahead of time [see no. 1 for why].
  3. Don't try to get any of your own cards done at the same time, this will only lead to your frustration & them making a mess.
  4. Pray that the baby stays asleep so you have both hands free while making cards.
  5. Children like to 'complete' a project, so when you realise it's dinner time & you haven't started cooking & tell them to pack up cause we can always finish the cards at another time, expect a tantrum or 3.
  6. When your toddler is behaving like a monster, remember that it's dinner time & you haven't started cooking & therefore she's very hungry.
  7. Don't expect help to pack up without having to yell & scream at them [see no. 5 for why].
  8. Crafting really is fun & it's good for them to do this with you!! Just be prepared ahead of time...

You'd think I would have learned my lesson after the last time I scrapbooked with them! If you missed that, you can find it in my archives or here: http://sewfrog.blogspot.com/2009/10/scrapbooking-with-children.html

[I still need help with these hyperlinks - somebody please help me].

Now I still have to finish off the cards with them another day... wish me luck!!


Wednesday, November 25, 2009

Retromummy's fabric giveaway

I just found out about this giveaway: http://retromummy.blogspot.com/2009/11/grandmothers-flower-garden-giveaway.html

Great blog to read, & the fabric in her store is gorgeous.

I'm sorry I don't know how to embed web addresses as hyperlinks [I'm a sewer not a computer expert] If anyone can let me know I'd appreciate it. But check out her blog first!

Thursday, November 19, 2009

TEA-DYEING TUTORIAL

Gather your tools:

garment/fabric to dye

stainless steel bowl or saucepan

tea bags

kettle

wooden spoon


1. Make up a solution of strong tea in a bowl or saucepan - I can't tell you how many tea bags or what volume of water - it depends on the colour depth you want to achieve, and how much fabric you are dyeing. You can always repeat the process if it's not dark enough, or wash/bleach if it's too dark.

REMOVE THE TEA BAGS before going any further, or you will get extra colour in the areas up against them.


2. Wet fabric with plain tap water. Whenever you are dyeing fabric or garments you should do this to ensure even take up of the dye.


3. Place into tea solution and stir with spoon to ensure tea touches all parts of fabric. The more the fabric can move around freely in the pot, the more even your colour will turn out [NOTE THIS POT IS TOO FULL].


4. Leave in for a minimum of 10 minutes, and then take out to check, remembering the colour is always darker when wet [leave overnight if you want a really strong colour].

5. Rinse under tap [a lot of colour will come out, this is normal] until water runs clear. This step is very important. You can add a couple of drops of dishwashing detergent, if desired.


6. Wring out or spin in machine to get as much water out as possible.

7. Dry in dryer [heat helps to set the colour] or iron when line dry.


BEWARE!
Fabric dyeing is extremely addictive. Once you start experimenting with different strengths of tea, different types of tea [yes, green tea gives a green dye], different methods of fabric preparation [tying, dipping, leaving fabric dry, not stirring], different lengths of time the fabric is in the solution etc etc you will be hooked!


Monday, November 9, 2009

GARMENT/SUIT BAG TUTORIAL


With my girls' ballet concert fast approaching I have been sewing costumes like crazy. Tonight I needed a break so I ran up this garment bag to carry the costumes to & from the concert. You don't need a pattern to make one of these at home, in fact all you need is a coat hanger.

You will need:
  • a hanger

  • tracing paper

  • fabric [I used just over 1 metre of 150cm wide fabric but the amount depends on the length you want your garment bag to be]

  • contrasting bias binding, either prepurchased [like I used] or make your own

  • a long zip [the exact length isn't critical as it depends how long you want to make your bag


What I did:


I traced the hanger onto a piece of paper to get the angle correct, then extended the angled sides 4 inches & then drew a straight line down to my desired length, about 30 inches [you can make this whatever length you like]. Round the corners if desired [trace around a saucer for a consistent curve].

Cut out two pieces of fabric from pattern and split one in half lengthwise [this will be the front].

Insert zip using your preferred method.

Turn over a scant hem at the top of each piece where the hanger hook will poke out.


Pin the front & back pieces WRONG SIDES TOGETHER. Stitch a narrow seam around edge or just tack them together well.

Sew bias binding around outside edge.

You are done.


Friday, November 6, 2009

NEW NAPPY BAG


I've just finished my new nappy bag. I'm really pleased with how it turned out. It's the first structured bag I've made. The pattern is found here http://amingledyarn.wordpress.com/gallery/tutorial-hip-mama-diaper-bag/ . It's just brilliant: lots of pockets to store things so they are easily accessible,big volume, yet not so huge it looks like you're carrying a spare tyre.


I altered the pattern slightly: used 3 inch strips of velcro on the flap instead of magnetic closures [so if I overstuff it I'll still be able to secure the flap]; & added a loop that winds around my drink bottle & attaches with velcro to keep my drink bottle standing up to one side. I also removed the regular zip pull & put a cute heart zip pull on there. A minor detail but every time I open that zip compartment the heart will make me smile.

Now I'm off to transfer everything from my old bag into it.

TEA-DYEING


I know you're wondering what on earth is in this bowl. Well this is a bowl of tea & I'm dyeing some fabric in it. I need off-white shirts under the repurposed shirt dress costume & now that I'm sewing all 9 costumes, I don't have time to make 9 shirts as well. So I bought some white ones & will dye them with tea.
Have you ever dyed with tea? It's very easy & fun. I first did it as a teenager with my Mum, we used to dye our white bras a tan colour so they didn't show under white shirts. Something to remember: over time tea dye washes out as modern detergents have 'stain removal' properties, and this process is really just staining a whole article of clothing. There are some things you can do to prevent this, which I will elaborate on in my next post.
Tea staining/dyeing gives a brown/tan colour, the depth of colour depends on how long you soak the fabric in the dye for. I believe you can use green tea to dye fabric green, and different varieties of teas [including herbal teas] give different colours/shades. It's an inexpensive way of experimenting with fabric dyeing. I've become quite obsessed with fabric dyeing after starting to experiment with it in June. My biggest problem is how to find the time to utilise all the fabric I've dyed already!!
So what can you dye with tea?
- white bras like we used to
- fabric for a quilt [I'll post a photo of this next time]
- doll's clothes or children's clothes for a vintage look
- stained clothing so you can use it again
- shirts for under costumes [well, that's my next dyeing project]
- paper to give it an antique look
- anything you can think of as long as it's mostly cotton or linen.
I'll post the 'how to' instructions next time...

Swimming togs for miss 6


I finished these a couple of weeks ago in time for Miss 6 to start swimming at school. I've since made a pair for Miss 4 & have some cut out ready for Miss 2 [just need to change the thread colour in my overlocker]. I really need some for myself, but can't decide on what style to make. I probably need access for breastfeeding which complicates matters somewhat. And my new binders for my coverstitch machine are taking some practice - I think it will be a while before my new togs are complete!!


Friday, October 30, 2009

FUN, FUN, FUN

I am having a lot of fun this week: re-purposing old men's business shirts into dresses for Miss 6's ballet concert costumes. There's something very satisfying about chopping up a perfectly good shirt [or an old, slightly stained one] and making something else out of it. I can't post any photos until the concert as the girls' ballet teacher likes to keep costumes a surprise until the children get out on stage.


I think I should chop up old clothes more often - it's fabulous therapy!!


Sunday, October 25, 2009

Potato Bake - gluten free!

I couldn't take a photo of the potato bake I made for last night's bbq because, as usual, there's barely any left. I always make my mum's recipe, which is easy & delicious. Everyone loves it, and I'm always asked for the recipe so here it is:

POTATO BAKE
Potatoes, peeled & sliced
Bacon, diced
Onion, diced
Cream
Tasty cheese, grated

Put a layer of potato slices in the base of an oven-proof dish.
Top with some bacon & onion [just a fine sprinkling].
Place another layer of potato on top.
Repeat bacon & onion layer.
Keep layering potato & bacon/onion until you get to the top of the dish.
Pour over some cream [I use about 300mL in my lasagne dish, you don't want it swimming in cream].
Cover with foil and bake at 180C for about 40 mins or until the potato is soft.
Uncover, top with cheese & return to oven until browned.

It is the best potato bake you'll ever taste, I guarantee it.

Tuesday, October 20, 2009

SUMMER DRESSES - TWIRLY OF COURSE!


It took me quite a few evenings, but I've finished the summer dresses for Miss 6, Miss 4 & Miss 2. I can't decide what size to make for Miss 0 seeing as she's growing so fast [10 weeks old now, doesn't time fly?].

I picked up the pattern at my local quilting store, it was called "Nina's Dress" & was sized for a 2-3 year old. Then I modified it [I can't help myself] & drafted larger sizes for the bigger girls. It's really a longer version of a twirly skirt, with a shaped bodice & first tier.


The girls have worn them a few times now, but I kept forgetting to take a photo. Every time they put them on they just start to twirl and dance. Very cute.

Saturday, October 17, 2009

pattern weights - tutorial

I completed these the night before going away. I love to sew, but the time taken to pin accurately the pattern to the fabric frustrates me. I'm hoping these will revolutionize my cutting out.

They're little pouches filled with rice in a couple of different sizes/shapes to suit different applications. I made mine out of corduroy scraps. The trick is don't over-fill them with rice or they aren't able to be moulded into position around necklines etc.

This is how it's done:
  1. Cut some rectangles of various sizes;
  2. Sew them up on 3 sides [right sides together]
  3. Turn them right way out & fill with rice [not too full]
  4. Fold raw edges inside pouch & machine stitch closed so no rice falls out

Finished crochet shopping bag


Here it is. I've used it a couple of times now & it's deceptively larger than it looks. It can hold 4 medium size teddies quite easily, or spare clothes, or a bit of shopping. The pattern is here:


I like the shape & structure given to the bag by the cd in the base. I think I'll make another one of these sometime soon.


Busy fingers


I've just spent a week away, but I haven't been idle. Here is my almost finished crochet shopping bag - just need to add handles. I'll post another picture when I'm done. Quite quick to make up actually, which is what I love about crochet. I've enjoyed having a hook in my hand again - it's been ages. I'll post another photo when I'm done.

Friday, October 9, 2009

card making with the big girls


Yesterday afternoon after school Miss 6 & Miss 4 wanted to do some stamping. We made birthday cards for a friend & for my niece. Great fun while the little two were asleep.

Miss 4 made the purple one [of course], Miss 6 the blue one, and mine is on the right.


Wednesday, October 7, 2009

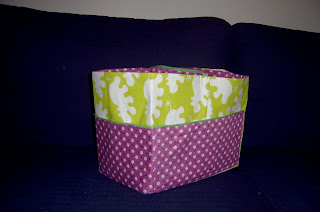
FABRIC BOX


In an attempt to organise my life, I decided to tackle something from my 'projects I'd like to make list' even though my 'current projects' list isn't getting much shorter. I had a go at the fabric box tutorial I found at this link http://becominghelly.blogspot.com/2008/08/boxing-helena.html but I made mine MUCH BIGGER as I wanted something for in the car [4 kids & all the stuff I need to have 'just in case' means my car is a second home sometimes].
I like to have a spare set of clothes, emergency nappy changing supplies, raincoats, picnic blanket, wipes, books with CD's, a toy or two, something for me to read, pen/pencil, knee rugs +/- a small pillow or two as well as the pram & whatever we have with us for that outing.

I'm hoping this will help to keep some of the above from rolling about in my car, escaping from under seats, etc.

Tuesday, October 6, 2009

masculine cards


Once a month or so, my Stampin Up consultant & friend, Julie, comes over & a group of ladies sit around my kitchen table & learn heaps from her. These workshops are very inspirational as she teaches us a different technique each time. Monday she showed us an all-over stamping technique & let us choose the designs/stamps we wanted to use. I chose a masculine theme as it's always so hard to come up with 'boy' cards.

Julie has some lovely card ideas on her website http://www.stampwithjulie.com.au/ and links to her blog from there too.