Friday, September 24, 2010

Summer kid's skirts

I spent two evenings this week sewing some summer skirts for the girls, seeing as we were going on holidays to the beach and they didn't fit in many of last season's clothes.
I started out making a couple for Miss 7 and one for Miss 3... but as you can see things got out of hand and I made a heap more. There are three styles of skirt: one is a full circle, one is a tiered skirt. Both are very quick and easy to make. The third style is the stripy one in the second photo. I found a fabulous wide-striped fabric last year just waiting for an opportunity to make one of these pleated skirts. I've box-pleated the stripes in, so it looks like a white skirt with coloured stripes. I love it - I wish I fit into it, but only Miss 7 does.

I can post a tutorial on how to make a full circle skirt here if anyone is interested. Let me know in the comment section if you'd like me to. I use them all the time as they're so pretty on the girls, and lovely to twirl in, plus SUPER quick.

Saturday, September 18, 2010

New quilt sneak peek

I'm making a new quilt [in a hurry] for my cousin's wedding present. I started by cutting the fabric tonight: I will post my progress over on quiltitis, my other blog.

Friday, September 17, 2010

Spring is here!

I may have mentioned previously that I have never been much of a gardener. But I am trying to change all that. As well as the Australian native garden we plan to have a large number of edibles throughout the yard, and a vege patch of course. This will take us a lot of time [so don't hold your breath] as we have to wait for our house renovations to be over. Just so the builders don't wreck any new plants with their vehicles etc.

I'm itching to get started, however, and have decided that I want to grow rosellas. My Nanna used to grow rosellas and I remember visiting her one weekend while I was at uni and helping her to pick them, shell them, and make jam. Let me tell you something about rosella jam: it's amazing! Nanna's rosella bushes are long gone now, so I started researching the plant in the hope of obtaining a couple.

I found out that the rosella is actually a type of hibiscus [which is another plant I'm very keen to grow, probably behind our pool] called Hibiscus Sabdariffa. I purchased some seeds online and planted them a couple of weeks ago... and they're growing!!!!!!!!!!!!!! A couple even have their second set of leaves starting.

They are in pots sitting in an old wheelbarrow covered in chicken wire, as the chooks would devour the sweet new leaves given half a chance. That's been handy, as I've needed to move them every couple of days out of our builder's way... we are renovating at the moment and the house and yard is in chaos!!!

Well, most of it is in chaos. Here is a picture of the native garden I mentioned in a previous post taken this afternoon:
What you may or may not realise is that we have a garden wall now, and TURF!! In the previous post about this native garden the green in the foreground of the photo is all weeds, which the chickens have since made short work of. It looks so lovely, and the kids were really excited to run on grass again. I hadn't realised till now just how depressing and dusty the yard had become. Poor little Miss 1 had forgotten what grass was, I think, and couldn't walk on it properly!

It's so nice to have one part of our home 'finished' so we can escape there at the moment.

Gluten free melting moments

The other week I made melting moments - something I've been wanting to bake for ages. I haven't made them for years. I have to admit, they're not very good for you [LOTS of butter] but so yummy it's worth making them for a special treat. I checked my recipe books on the shelf, then looked online, and then made up my own recipe based on my research:

MICHELLE'S MELTING MOMENTS
250g butter
1/3 cup icing sugar
1 1/2 cups plain flour [gluten free of course - I make up the Bette Hagman mixture]
1/2 cup cornflour
1 tsp vanilla
Filling:
60g butter
1 tsp lemon rind
3 tsp lemon juice
2/3 cup icing sugar

Beat butter, icing sugar & vanilla essence with electric beaters until pale and creamy. Add flours and mix until a soft dough forms. Pipe rounds with large star nozzle onto a baking paper-lined tray. Bake at 160C for 15 minutes. Cool on tray.

For filling: beat butter, lemon juice and lemon rind until pale. Add icing sugar and beat until combined. Refrigerate until required.

Assemble biscuits and enjoy!!

These biscuits are AMAZING. You don't have to pipe them if you don't want to: roll small balls and flatten them slightly with the back of a fork. You MUST however cool them on the baking tray or they will just crumble everywhere. Don't ask me how I know this.

Thursday, September 2, 2010

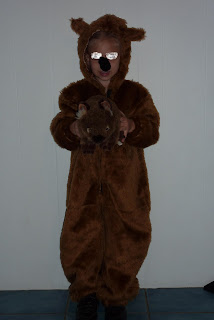
Wombat costume - tips on sewing faux/fake fur

It was Book Week last week and Miss 5 had a dress-up day at school [as her favourite book character]. She decided [much to my dismay] that her favourite book was 'Diary of a Wombat'. So I had to make a wombat costume:
I found a pattern in an old Top Kids magazine that I thought would work, and jumped in.

I learnt a bit about fake/faux fur while doing this project which I thought I'd share with you in case you one day have to sew with this medium too. I have to admit I was nervous before I started.

THINGS I LEARNED ABOUT SEWING WITH FAKE FUR:
  1. Expect the sewing room to look like you murdered a small furry animal in it.
  2. Use a craft knife and cut single pieces from the back, then comb all fibres away from seam allowance prior to sewing, that way you won't cut the fur itself and not only is it tidier [see point 1] but you won't see your seam lines.
  3. If you don't care about seeing the seams, use normal scissors - just make sure they're not your bestest most sharpest [or they won't be for long!].
  4. Use a medium width zig zag for seams instead of straight stitches [it doesn't catch the fur as much].
  5. The reverse side of fake fur can be a little scratchy. I lined this costume with satin so it felt lovely on.
  6. Make the costume bigger than it needs to be so that all your children [even bigger ones] can try it on... they'll want to!
  7. It's a very easy medium to work with - on this scale. Making something very small like a stuffed toy could prove more difficult.
I'll be using fake fur again, it was great fun to work with!