Showing posts with label craft. Show all posts

Friday, June 29, 2012

Ideas for school holiday fun

It is the winter school holiday/break now in Queensland.  Two [or three] weeks of no school.  I am definitely going to use some of the 75 ideas from this blog to keep the girls amused and have some fun with them.

I've also been collecting ideas on pinterest for us to do together. 

Usually I choose a few favourites, show the girls, and then they come up with a list of 10-15 activities they want to do too. 

I LOVE school holidays.

Tuesday, June 26, 2012

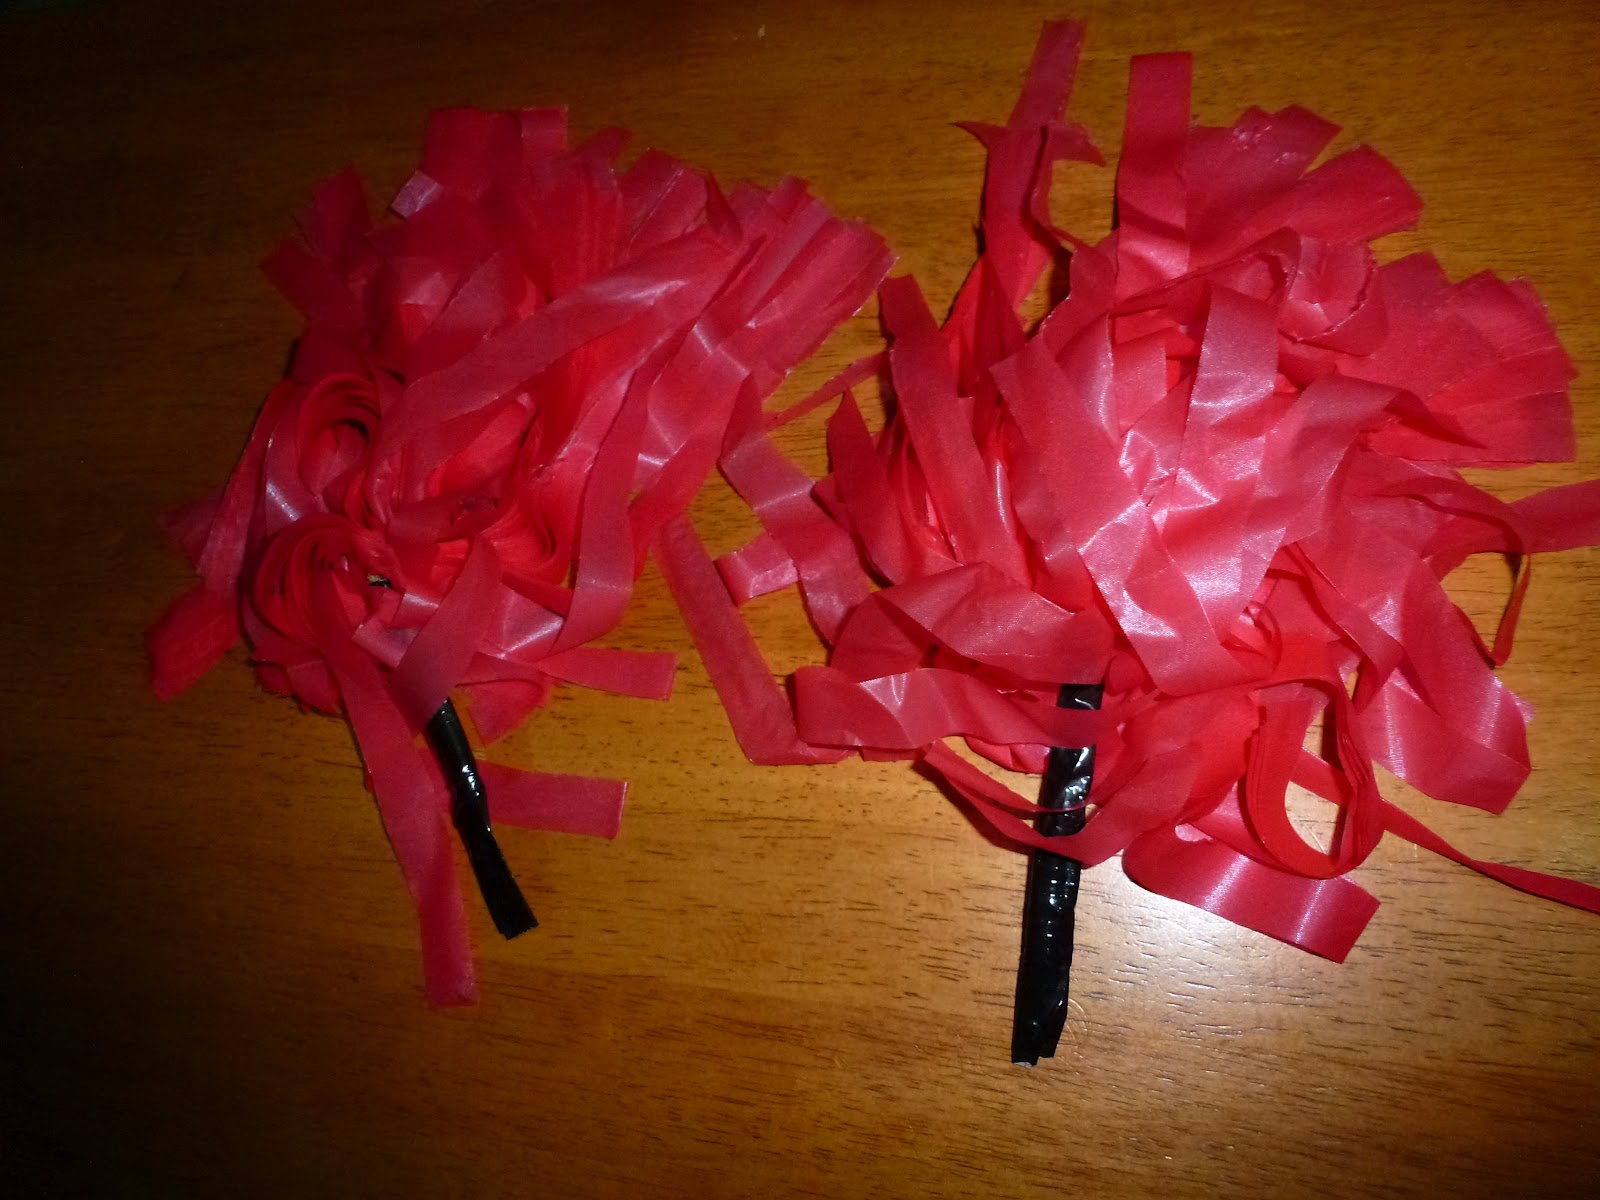
TUTORIAL: make your own pom poms to cheer your team

My girls have had school athletics carnivals in the past few weeks.  We made pom poms [also called streamers] for cheering their team mates on.  Unfortunately in my photos they look rather pink, in fact the pom poms are all RED in real life!!

 For this project you will need:
 string
gaffer or electrical tape
and either a disposable plastic tablecloth or crepe paper in your team colours.

Step 1: cut the plastic/crepe paper into roughly 1cm strips and lay them out on a flat surface.

Step 2: tie the strips together in the centre with string.

Step 3: push the streamers away from the ends of the string.

Step 4: wrap the string ends in gaffer or electrical tape to form a handle.

Step 6: twist each individual strand of the pom pom to separate the strands and make it 'fluff out".


I haven't made one [or two] of these since I was at school, but it was extremely quick and easy to do.  You could experiment with other types of materials to use for the streamers.  I chose the disposable plastic table cloth because I thought it would be more durable than crepe paper, and perhaps last more than one day.  You could also use fabric, knitting yarn, or other colourful materials of your choosing.


Sunday, April 29, 2012

Thankyou cards

Recently I received a lot of help from some dear friends and family.  I wanted to make thankyou cards for the wonderful people who helped out in a hurry.  Here is what I've made them:


Saturday, April 14, 2012

a cute holiday project

I am so proud of Miss 9.  She hand sewed this doll all by herself over the Easter weekend.  Actually it only took her a day.  I found the kits at Aldi and thought it might be a good holiday activity to keep her and Miss 7 busy for a week or so.

I really wish I bought more kits at the time - the holes were pre-punched in the felt, and everything required to complete the doll was in the little box.  Isn't it adorable?

Friday, January 27, 2012

kids backpack - tutorial

The backpack construction is of two modified rectangles joined by a zippered gusset.  Take your main fabric and cut two rectangles of the approximate size you want your backpack to be. 

Fold them in half lengthwise and round the corners to the finished shape.


Take your lining fabric and repeat the process, using the main fabric as a guide.


If you want to applique or embellish the front of your backpack, now is the time to do so.


Cut gusset pieces out of main fabric and lining.  They must be as long as the circumference of your bag.  Cut the gussets in half, then sew together again.  I sewed two zips in, one in each end, and stitched in between.

You will have a long strip with a zip in each end.


Make shoulder straps from lining and/or main fabric.  I attached a short piece of elastic at the bottom of each strap, rather than making them adjustable.


Hold bag front and lining, WRONG sides together.  Do the same for the bag back. Pin straps to back of bag.  Baste.  Add a loop for hanging if desired.


Pin gusset to front and back and stitch.  Bind seams with contrasting binding.


Sunday, January 15, 2012

Pin cushion bins


Many years ago I purchased a pattern on ebay for a pin cushion bin, as with a new baby didn't have the mental capacity in my sleep-deprived state to work out how to make one myself.

Since then I have made several - for my Quiltitis pals, for my sewing relatives, another for myself when mine was lost in the last move.  Several months ago my aunt and mum both mentioned that their pincushion bins were worn out.  I think they use theirs for scrapbooking [as a bin only] as well as for sewing and quilting.

These two were replacements for Mum and my aunt.  Mum's is pieced from charm squares that match her sewing room and decor.  I managed to finish them by Christmas... just.

At some stage I will have to make myself another one that matches my new sewing room.  Just another project to add to my 'To Do' list!

Wednesday, September 21, 2011

KID'S TRAVEL ACTIVITY ORGANISERS

I remember going places as a child with my 'busy bag'. Mum put together a bag for myself and my sister that contained a little doll, pencils and paper, a puzzle, and I forget what else. We loved playing with them: on holidays, at people's houses, at church. Sometimes we'd ask Mum to get them out for us to play with at home.
When preparing for our recent trip to Sydney I decided that we needed a variation of this for on the plane.  All four girls would need to be occupied for a considerable time, with only their tray table to work on.  Here is what I made up for them:

I filled them with notebooks, puzzle/colouring books, stickers, a new book [picture book or novel], a few coloured pencils, a lead pencil and rubber.  They were a hit.  I whipped up four over two evenings, no sweat.  And the best part is, they can be used over and over at church, when waiting in the car, other holidays. 

I will post a tutorial soon.  I'm thinking I may need my own, it's just the right size to fit in my bag, and better than any organiser I've ever owned.  You could customize it with pockets etc. to suit your own needs.


Wednesday, August 31, 2011

Princess, Princess Book Week Costume

The second Book Week costume I made last week was for Miss 6, who decided to be the princess from Princess, Princess.
Of course, she didn't have any dress that fit her anymore, so I this one I made out of broderie anglaise fabric, and drafted an empire line dress with long sleeves. I threaded a number of beads I found at a dollar store onto hat elastic for the necklace, and made the crown with some dollar store jewels, metallic pipe cleaners and my hot glue gun.

Sunday, August 28, 2011

EJ 12 belt

It was Book Week again last week so I was making costumes once again. Miss 8 enjoys reading a fairly new book series called EJ-12 about a girl-spy who solves mysteries. I was very excited when Miss 8 told me she would be wearing black pants, a long-sleeved black shirt, and black shoes & socks [all of which she owns]. Then she requested a belt, which holds a pouch for a torch.
It came together very quickly, so to finish off I found an extra large black button and hot-glued the letters E and J to the front, then I attached it as a buckle.
I think it was my favourite costume ever... taking me less than an hour!!

Sunday, July 3, 2011

puffy painting

While doing some blog-hopping just before the school holidays, I came across this blog and saved the idea for a possible holiday activity. We had a go the other day, when we had some friends over, and it was truly fabulous. I had 7 kids here ranging in age from 23 months to 13.7 years [the 0.7 is important] and they all REALLY enjoyed this quick and easy craft.

Can I suggest a couple of tips BEFORE you sit down with the kids to do this:

- cut out a LOT of cardboard ahead of time [they go through it pretty quick] I'm sure paper would work, but it would be messier to get in to the microwave.

- use cotton buds instead of paint-brushes [it makes for quick and easy clean-up].

- I made up 6 batches in 6 individual ramekins, then we added the food colouring in primary and then secondary colours, helps to reinforce this with older kids, and the younger ones love the surprise when red and yellow make orange for example.


In each ramekin put 1 tablespoon of self-raising flour, 1 tablespoon of salt, and 3-4 tablespoons of water. Mix into a nice smooth paste, then add your colour!


When your masterpieces are complete, microwave on high for 20-30 seconds.


That's it.


Fantastic, cheap holiday fun.

Wednesday, June 15, 2011

Funky Ruffled Scarf - knitted

My MIL went to the textile show at the Brisbane Convention Centre last weekend and then came to visit us. She bought some new yarn called Funky Yarn while she was there for herself and me to try out. It is amazing - one ball does the entire scarf and I knitted it in just a few hours. And I'm NOT a knitter, so it must be easy. This is the very first knitted item I have blogged about because it's the first knitted thing I've made since I learned to knit as a kid. Six stitches on the needle, that's all.
The website that was on the information regarding this product looks to be still under construction so I'm unsure where to obtain more. I've emailed them and hope to have some more information about where to purchase it very soon. It's almost like a lacy mesh wound into a ball of yarn, very beautiful. I'm glad we've had some very cold weather for me to try out my new scarf!!

Wednesday, January 26, 2011

Happy Belated New Year

Well I'm back after a VERY long summer holiday. Looking back at the end of 2010 I got really slack at blogging. I have a few excuses:

- my Mum's health took a downward turn for a while [thankfully she's good now]

- we moved in with the folks while our house got pulled apart [renovating]

- the end of the year is always busy, with ballet concerts, school concerts etc.

- my crafting and cooking became focussed on what I NEEDED to do for that week.

- this situation has continued until today, when I finished sewing kindy sheets for Miss 3 ready to start kindy this Friday.

- it has been Christmas holidays so I've had all 4 cherubs home and too tired at night to craft much

- here in Queensland we've had major flooding, including in my hometown


Anyway those are the excuses... I have a few pics of projects I've completed over the past couple of months. Unfortunately more missed out on photographs than I thought:

Firstly, a nappy cake I made for a friend who had a new baby:


Then, the christmas gifts for each of the girls' school teachers [all 7 of them] - a set of homemade cards in matching box, with a block of chocolate.

I can't find a photo of the 3 string bags I crocheted for my MIL and SIL's for Christmas, or the 5 crocheted kitchen hand towels, or the dress I made for my niece's birthday. I also missed photos of the towel elephants I made as Christmas gifts for other family members. Not to mention the cooking... I even had a go at gluten free crumpets.

Oh well. At least writing that list, I realise I haven't been idle. I'm planning to blog more regularly in 2011. And craft more.

In case you're wondering, the house isn't finished, we'll be living in a work zone for a few months yet.


Saturday, September 18, 2010

New quilt sneak peek

I'm making a new quilt [in a hurry] for my cousin's wedding present. I started by cutting the fabric tonight: I will post my progress over on quiltitis, my other blog.

Wednesday, June 9, 2010

Mum's coffee & card morning


This morning I invited some of the Mums from my new playgroup over for morning tea & to make a card or two. They'd never stamped or made cards before so it was great fun showing them how easy it is. I am VERY thankful that Julie taught me so well, I learnt from her that having everything pre-cut and being prepared is the best way to go. The girls are keen to do it again another day, so I guess I'm running coffee & card mornings now!

Saturday, June 5, 2010

THE CRAFT ROOM


One reason I've been unable/unmotivated to craft lately has been that, since the move, I haven't been able to get my room sorted. I've dreamed of my craft room for a loooong time, and eventually we'll probably build it in, but not until I get the design right! I tackled it again last week, and after a number of hours of sorting/tidying/moving furniture etc. I think I'm ready to sew. A good thing too, cause I have to make a character skirt, and a few other things asap.

My papercraft area is still needs a little work...


Wednesday, December 2, 2009

More Christmas cards...


In a previous post about my last day making cards with Julie I mentioned I'd be using one design for the girls to give to their school friends. Yesterday I worked quite hard [around the school concert, dinner, & other activities] to get these done. I did have some help, but I've discovered that if you have to make 48 identical cards & you are doing them in a production line [ie all cutting first, then all the scoring, then stamping, then folding] a 2 year old gets bored very quickly, and a 4 year old quite soon after. So the help was short-lived, which made me much quicker!
I've just taped candy canes in 21 of them for Miss 4, who has stamped 'love from Miss 4' on the inside of the cover. Miss 6 can write in hers [she doesn't know that yet]. It's a lovely way of combining a card & candy cane gift in one. Although I must say I don't want to make any more for a while...