Saturday, November 28, 2009

MAKE AN ADVENT CALENDAR


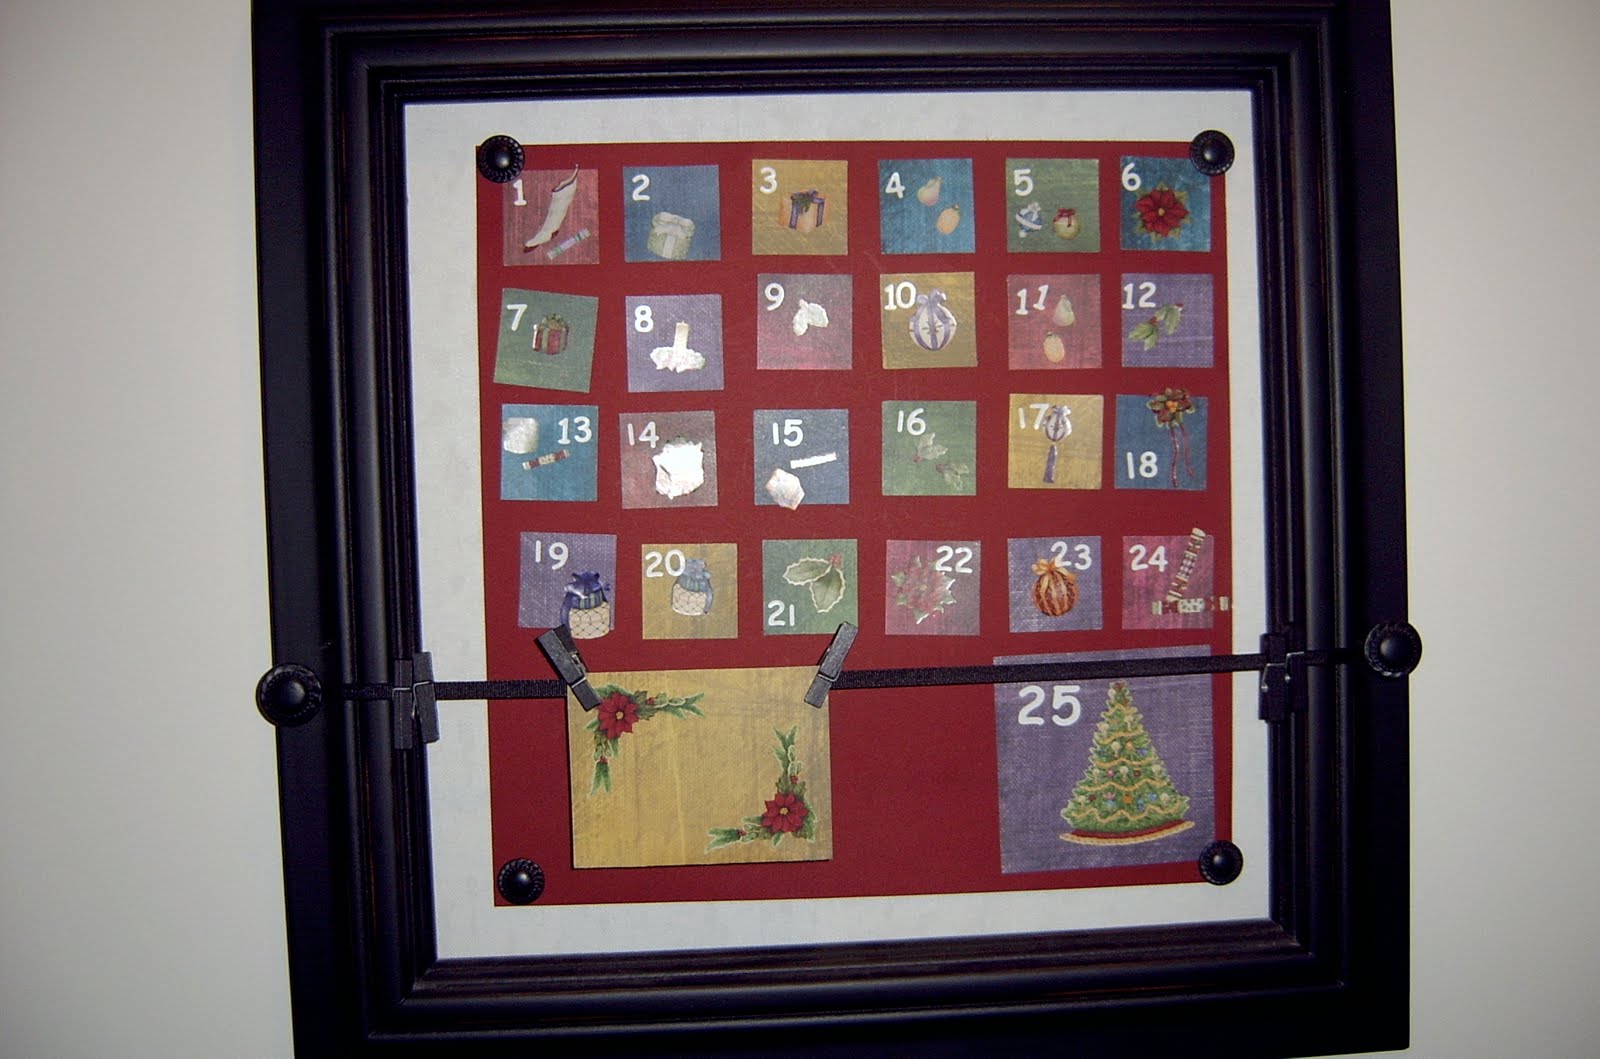
Here is a photo of the Advent Calendar the girls & I made this afternoon. Today I was somewhat prepared, which is why I'm not so stressed out compared with yesterday's card effort. It also took much less time & less clean up, surprise, surprise!

I just used my large square punch, and punched out 24 squares of coordinating paper. Then the girls stuck them to a piece of 12x12 cardstock and decorated each square with a sticker or two.

I added the numbers [to ensure we got all 24 days as Miss 4 tends to miss number 17 when counting] and Miss 2 put the larger Christmas tree sticker on a 9x9 cm square of paper. We put it up on my Everyday Display [Creative Memories magnetic display board - you could use a frame or put it on the fridge or wherever].

Then I made a little envelope by folding a piece of paper in half & sticking down each side & pegged it up on the ribbon. That's to hold the squares that we'll stick over each day.

Now, you could use coloured paper squares, X's or you could have a creative husband like me who suggested we print a photo of the family, cut it up into squares, and use that to cover each day's square! As long as we get each piece of the photo in the correct spot, it's a great idea...

If you want to reuse your calendar each year, you could stick a small magnet to the back of each photo piece [or X, or coloured square] but I think I'll just use a bit of double-sided tape...

Here is a close up [well, sort-of]:


Friday, November 27, 2009

Things I've learnt making cards with children

Yesterday afternoon I decided to be spontaneous & get the girls to help me make cards for their teachers to say thanks for this year. This is what I learned:
  1. Be prepared ahead of time [don't spend the first 5-10 minutes gathering all your supplies together as the kids get bored & into mischief VERY fast!].
  2. If you are doing paper craft of some type, have the card cut ahead of time [see no. 1 for why].
  3. Don't try to get any of your own cards done at the same time, this will only lead to your frustration & them making a mess.
  4. Pray that the baby stays asleep so you have both hands free while making cards.
  5. Children like to 'complete' a project, so when you realise it's dinner time & you haven't started cooking & tell them to pack up cause we can always finish the cards at another time, expect a tantrum or 3.
  6. When your toddler is behaving like a monster, remember that it's dinner time & you haven't started cooking & therefore she's very hungry.
  7. Don't expect help to pack up without having to yell & scream at them [see no. 5 for why].
  8. Crafting really is fun & it's good for them to do this with you!! Just be prepared ahead of time...

You'd think I would have learned my lesson after the last time I scrapbooked with them! If you missed that, you can find it in my archives or here: http://sewfrog.blogspot.com/2009/10/scrapbooking-with-children.html

[I still need help with these hyperlinks - somebody please help me].

Now I still have to finish off the cards with them another day... wish me luck!!


Wednesday, November 25, 2009

Retromummy's fabric giveaway

I just found out about this giveaway: http://retromummy.blogspot.com/2009/11/grandmothers-flower-garden-giveaway.html

Great blog to read, & the fabric in her store is gorgeous.

I'm sorry I don't know how to embed web addresses as hyperlinks [I'm a sewer not a computer expert] If anyone can let me know I'd appreciate it. But check out her blog first!

Thursday, November 19, 2009

TEA-DYEING TUTORIAL

Gather your tools:

garment/fabric to dye

stainless steel bowl or saucepan

tea bags

kettle

wooden spoon


1. Make up a solution of strong tea in a bowl or saucepan - I can't tell you how many tea bags or what volume of water - it depends on the colour depth you want to achieve, and how much fabric you are dyeing. You can always repeat the process if it's not dark enough, or wash/bleach if it's too dark.

REMOVE THE TEA BAGS before going any further, or you will get extra colour in the areas up against them.


2. Wet fabric with plain tap water. Whenever you are dyeing fabric or garments you should do this to ensure even take up of the dye.


3. Place into tea solution and stir with spoon to ensure tea touches all parts of fabric. The more the fabric can move around freely in the pot, the more even your colour will turn out [NOTE THIS POT IS TOO FULL].


4. Leave in for a minimum of 10 minutes, and then take out to check, remembering the colour is always darker when wet [leave overnight if you want a really strong colour].

5. Rinse under tap [a lot of colour will come out, this is normal] until water runs clear. This step is very important. You can add a couple of drops of dishwashing detergent, if desired.


6. Wring out or spin in machine to get as much water out as possible.

7. Dry in dryer [heat helps to set the colour] or iron when line dry.


BEWARE!
Fabric dyeing is extremely addictive. Once you start experimenting with different strengths of tea, different types of tea [yes, green tea gives a green dye], different methods of fabric preparation [tying, dipping, leaving fabric dry, not stirring], different lengths of time the fabric is in the solution etc etc you will be hooked!


Monday, November 9, 2009

GARMENT/SUIT BAG TUTORIAL


With my girls' ballet concert fast approaching I have been sewing costumes like crazy. Tonight I needed a break so I ran up this garment bag to carry the costumes to & from the concert. You don't need a pattern to make one of these at home, in fact all you need is a coat hanger.

You will need:
  • a hanger

  • tracing paper

  • fabric [I used just over 1 metre of 150cm wide fabric but the amount depends on the length you want your garment bag to be]

  • contrasting bias binding, either prepurchased [like I used] or make your own

  • a long zip [the exact length isn't critical as it depends how long you want to make your bag


What I did:


I traced the hanger onto a piece of paper to get the angle correct, then extended the angled sides 4 inches & then drew a straight line down to my desired length, about 30 inches [you can make this whatever length you like]. Round the corners if desired [trace around a saucer for a consistent curve].

Cut out two pieces of fabric from pattern and split one in half lengthwise [this will be the front].

Insert zip using your preferred method.

Turn over a scant hem at the top of each piece where the hanger hook will poke out.


Pin the front & back pieces WRONG SIDES TOGETHER. Stitch a narrow seam around edge or just tack them together well.

Sew bias binding around outside edge.

You are done.


Friday, November 6, 2009

NEW NAPPY BAG


I've just finished my new nappy bag. I'm really pleased with how it turned out. It's the first structured bag I've made. The pattern is found here http://amingledyarn.wordpress.com/gallery/tutorial-hip-mama-diaper-bag/ . It's just brilliant: lots of pockets to store things so they are easily accessible,big volume, yet not so huge it looks like you're carrying a spare tyre.


I altered the pattern slightly: used 3 inch strips of velcro on the flap instead of magnetic closures [so if I overstuff it I'll still be able to secure the flap]; & added a loop that winds around my drink bottle & attaches with velcro to keep my drink bottle standing up to one side. I also removed the regular zip pull & put a cute heart zip pull on there. A minor detail but every time I open that zip compartment the heart will make me smile.

Now I'm off to transfer everything from my old bag into it.

TEA-DYEING


I know you're wondering what on earth is in this bowl. Well this is a bowl of tea & I'm dyeing some fabric in it. I need off-white shirts under the repurposed shirt dress costume & now that I'm sewing all 9 costumes, I don't have time to make 9 shirts as well. So I bought some white ones & will dye them with tea.
Have you ever dyed with tea? It's very easy & fun. I first did it as a teenager with my Mum, we used to dye our white bras a tan colour so they didn't show under white shirts. Something to remember: over time tea dye washes out as modern detergents have 'stain removal' properties, and this process is really just staining a whole article of clothing. There are some things you can do to prevent this, which I will elaborate on in my next post.
Tea staining/dyeing gives a brown/tan colour, the depth of colour depends on how long you soak the fabric in the dye for. I believe you can use green tea to dye fabric green, and different varieties of teas [including herbal teas] give different colours/shades. It's an inexpensive way of experimenting with fabric dyeing. I've become quite obsessed with fabric dyeing after starting to experiment with it in June. My biggest problem is how to find the time to utilise all the fabric I've dyed already!!
So what can you dye with tea?
- white bras like we used to
- fabric for a quilt [I'll post a photo of this next time]
- doll's clothes or children's clothes for a vintage look
- stained clothing so you can use it again
- shirts for under costumes [well, that's my next dyeing project]
- paper to give it an antique look
- anything you can think of as long as it's mostly cotton or linen.
I'll post the 'how to' instructions next time...

Swimming togs for miss 6


I finished these a couple of weeks ago in time for Miss 6 to start swimming at school. I've since made a pair for Miss 4 & have some cut out ready for Miss 2 [just need to change the thread colour in my overlocker]. I really need some for myself, but can't decide on what style to make. I probably need access for breastfeeding which complicates matters somewhat. And my new binders for my coverstitch machine are taking some practice - I think it will be a while before my new togs are complete!!