Friday, October 30, 2009

FUN, FUN, FUN

I am having a lot of fun this week: re-purposing old men's business shirts into dresses for Miss 6's ballet concert costumes. There's something very satisfying about chopping up a perfectly good shirt [or an old, slightly stained one] and making something else out of it. I can't post any photos until the concert as the girls' ballet teacher likes to keep costumes a surprise until the children get out on stage.


I think I should chop up old clothes more often - it's fabulous therapy!!


Sunday, October 25, 2009

Potato Bake - gluten free!

I couldn't take a photo of the potato bake I made for last night's bbq because, as usual, there's barely any left. I always make my mum's recipe, which is easy & delicious. Everyone loves it, and I'm always asked for the recipe so here it is:

POTATO BAKE
Potatoes, peeled & sliced
Bacon, diced
Onion, diced
Cream
Tasty cheese, grated

Put a layer of potato slices in the base of an oven-proof dish.
Top with some bacon & onion [just a fine sprinkling].
Place another layer of potato on top.
Repeat bacon & onion layer.
Keep layering potato & bacon/onion until you get to the top of the dish.
Pour over some cream [I use about 300mL in my lasagne dish, you don't want it swimming in cream].
Cover with foil and bake at 180C for about 40 mins or until the potato is soft.
Uncover, top with cheese & return to oven until browned.

It is the best potato bake you'll ever taste, I guarantee it.

Tuesday, October 20, 2009

SUMMER DRESSES - TWIRLY OF COURSE!


It took me quite a few evenings, but I've finished the summer dresses for Miss 6, Miss 4 & Miss 2. I can't decide what size to make for Miss 0 seeing as she's growing so fast [10 weeks old now, doesn't time fly?].

I picked up the pattern at my local quilting store, it was called "Nina's Dress" & was sized for a 2-3 year old. Then I modified it [I can't help myself] & drafted larger sizes for the bigger girls. It's really a longer version of a twirly skirt, with a shaped bodice & first tier.


The girls have worn them a few times now, but I kept forgetting to take a photo. Every time they put them on they just start to twirl and dance. Very cute.

Saturday, October 17, 2009

pattern weights - tutorial

I completed these the night before going away. I love to sew, but the time taken to pin accurately the pattern to the fabric frustrates me. I'm hoping these will revolutionize my cutting out.

They're little pouches filled with rice in a couple of different sizes/shapes to suit different applications. I made mine out of corduroy scraps. The trick is don't over-fill them with rice or they aren't able to be moulded into position around necklines etc.

This is how it's done:
  1. Cut some rectangles of various sizes;
  2. Sew them up on 3 sides [right sides together]
  3. Turn them right way out & fill with rice [not too full]
  4. Fold raw edges inside pouch & machine stitch closed so no rice falls out

Finished crochet shopping bag


Here it is. I've used it a couple of times now & it's deceptively larger than it looks. It can hold 4 medium size teddies quite easily, or spare clothes, or a bit of shopping. The pattern is here:


I like the shape & structure given to the bag by the cd in the base. I think I'll make another one of these sometime soon.


Busy fingers


I've just spent a week away, but I haven't been idle. Here is my almost finished crochet shopping bag - just need to add handles. I'll post another picture when I'm done. Quite quick to make up actually, which is what I love about crochet. I've enjoyed having a hook in my hand again - it's been ages. I'll post another photo when I'm done.

Friday, October 9, 2009

card making with the big girls


Yesterday afternoon after school Miss 6 & Miss 4 wanted to do some stamping. We made birthday cards for a friend & for my niece. Great fun while the little two were asleep.

Miss 4 made the purple one [of course], Miss 6 the blue one, and mine is on the right.


Wednesday, October 7, 2009

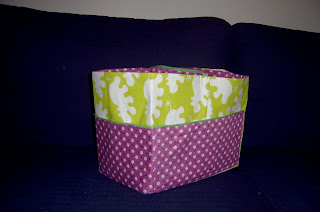
FABRIC BOX


In an attempt to organise my life, I decided to tackle something from my 'projects I'd like to make list' even though my 'current projects' list isn't getting much shorter. I had a go at the fabric box tutorial I found at this link http://becominghelly.blogspot.com/2008/08/boxing-helena.html but I made mine MUCH BIGGER as I wanted something for in the car [4 kids & all the stuff I need to have 'just in case' means my car is a second home sometimes].
I like to have a spare set of clothes, emergency nappy changing supplies, raincoats, picnic blanket, wipes, books with CD's, a toy or two, something for me to read, pen/pencil, knee rugs +/- a small pillow or two as well as the pram & whatever we have with us for that outing.

I'm hoping this will help to keep some of the above from rolling about in my car, escaping from under seats, etc.

Tuesday, October 6, 2009

masculine cards


Once a month or so, my Stampin Up consultant & friend, Julie, comes over & a group of ladies sit around my kitchen table & learn heaps from her. These workshops are very inspirational as she teaches us a different technique each time. Monday she showed us an all-over stamping technique & let us choose the designs/stamps we wanted to use. I chose a masculine theme as it's always so hard to come up with 'boy' cards.

Julie has some lovely card ideas on her website http://www.stampwithjulie.com.au/ and links to her blog from there too.


Sunday, October 4, 2009

I SPY BAGS


The girls are obsessed with I Spy & Spot What books. So when I saw this idea for I Spy bags

http://savvychic.wordpress.com/2007/07/01/crafts-i-spy-pouch/

I thought they'd be brilliant to take in the car, to church, waiting rooms etc.


So the other day I thought I'd have a go. I made 3 that are 4 x 4 inches, and 2 that are 6 x 6 inches. I went to my local craft store & bought a heap of interesting buttons & beads, raided my stash, & set to work.


Sewing a vinyl window into a square of fabric is quite easy - but if it worries you, make the entire top side of the pouch out of vinyl. If you use a knit fabric you won't have to worry about turning the raw edges under as I did.


I took a photo of the 'fillings' for each bag before putting them in, so the older kids had a 'list' to search for. They're laminated & attached to the ribbons I've sewn to the pouches.


I think I filled the pouches too full of rice initially, so I unpicked them & pulled some out after this photo was taken. They did keep Miss 2 occupied for a while at church this morning, so I think it has been a success.


TIPS:
- Don't fill too full with rice or you cannot manipulate the bags enough to see the items inside.

- Don't make them too big - little hands can't manipulate them easily & you'll need too many 'fillings'. The 4 x 4 inch ones are the biggest I'd attempt in future.

Saturday, October 3, 2009

scrapbooking with children

I have been promising Misses 6 & 4 that we would do some scrapbooking together during these school holidays. Seeing as today was really the final day of the holidays, I thought I'd better make good on my promise & do some with them.

Can I just say that in my mind, when I plan to scrapbook with my children I see us all sitting calmly together, working at our own pace, enjoying each other's company, with me achieving heaps of my own pages & ooh-ing & ahh-ing at their beautiful work.

I remember now that in my head it is a fantasy.

Here is a snapshot of what happened:

ME: Okay, Miss 4, what colour would you like for your background?
Miss 4: Purple.
Miss 6: I want that too. No, I want blue, do you actually have any blue? [rummages through papers]
ME: How about this one? Miss 2, why are you screaming? No, Miss 4 was on that chair first how about you sit on this one?
Miss 4: This needs cutting.
ME: [looking panicked] Let me help you with that, darling. What colour do you want next?
Miss 4: Purple.
Miss 6: Mummy why won't this cut?
ME: Hang on, let me help Miss 4 & I'll help you. Look, Miss 2, here is a photo of you, do you like this pink paper to put it on?
Miss 2: Ooh, my favrit colour!!
ME: Miss 4 what colour would you like now? How about this one, Miss 6? Stick it on here, Miss 2. Oh dear I think Miss 0 has woken up...
Miss 4: Purple
Miss 6: I have an idea...
Miss 2: I want dat one!!
ME: Don't screw up your paper Miss 2, we're going to stick your photo onto it. Let's pick up Miss 0. Would you like some white stickers for your name, Miss 4?
Miss 4: No, I want purple. How do you spell 'Miss 4'?
Miss 6: Do you have blue letters? Actually I think I'll use red.
ME: Let's put your name on your page, Miss 2. Oooh, it's lovely, would you like to show Daddy? 'M...I...S...S'
Miss 2: Yes, where is Daddy?
Miss 4: What comes after 'I'?
ME: Downstairs I think. Here, Miss 6, try this. '...S...4'
Miss 2: [screaming] I not want Daddy see me.
ME: Do you need anything else on your page? Hang on, it's hard to do one-handed [holding Miss 0], here you are. Miss 2 why don't you want him to see your pretty page?
Miss 6: Where are the flower punches? Can you get me some glue?
Miss 4: Purple.

At this point I comtemplated having a large glass of wine...

Needless to say I didn't get any of my own scrapbooking done.

ROMAN BLINDS - MAKE YOUR OWN

I decided a little while back to pull down the curtains in the girls' rooms and make them roman blinds instead.

Although they've been 'hanging' for a while, today I finally got around to threading the cords so they actually go UP & DOWN. There were some very excited girls in our house this afternoon. Go figure.

This is how I made mine:


  1. Measure the windows from outside of architrave to outside of architrave. This is the finished size of blind.

Add 2 inches to each width [side to side measurement] for hems, and 3 inches to length [the up & down measurement] for hems.
3. Work out how much fabric to buy. My windows are wider than the fabric you buy on the roll so I had to join two bits together to make it wide enough for each window.

4. Join [if required] & hem your fabric.

5. On the back, I added pockets made of calico along the width of the blind at 25cm intervals. If your fabric didn't have a pattern like mine, you could make your blinds longer and form the pockets out of the blind fabric itself.

6. Attach small plastic rings along top of pockets at regular intervals. I sewed mine on by machine [wide zig zag stitch, 0 stitch length] but by hand is okay too, I'm just lazy.

7. Thread long timber dowels down each pocket. Tie cord to bottom ring and thread up blind.

8. Attach sew & stick Velcro to blind & window frame [sew part to blind, stick part to window].

9. Put blind up & thread cord through hardware attached to window frame by Mr E.

VOILA!!

Thursday, October 1, 2009

meat cubes & eggplant parmigiana

My sister is an amazing cook. I like to think I'm pretty good, but she is amazing. While I am always taking shortcuts, she takes the time to do things 'properly', or will try recipes that require time &/or effort. So does Mum. I'm the sort of cook that looks at a food and says, that is too much work for something that will be eaten in one mouthful.


Like meatballs. I happen to love meatballs. But the effort of making enough to feed my family & then have enough leftover to freeze for another day [I told you I take shortcuts] means I don't make them. Then I realised that if I make meat cubes it would be quicker... so I press my mince mixture into a slice tray, bake in the oven, then cut up into cubes for freezing or frying.


I don't think sis would do that. She'd make meatballs. So would Mum. This is why I'm amazed that I've fallen in love with one of my sister's recipes & will keep making it. It's delicious, of course [everything she makes is], and so QUICK & EASY even a lazy cook like me will do it.


Eggplant Parmigiana
eggplant
150g plain flour [I use rice flour as my gluten free alternative in this recipe] seasoned with pepper
750g bottled tomato pasta sauce
200g grated mozarella cheese
100g grated parmesan cheese
1 tbsp fresh basil [I only keep dried - it works fine]

Cut eggplant into 1 -1.5cm slices.
Dust with flour, shake off excess.
Fry 4-5 mins in frying pan till browned

Spread a layer of tomato sauce in baking dish & top with a layer of eggplant. Add more sauce, mozarella, then basil. Repeat layering. Finish with sauce, mozarella & parmesan.

Bake 40 minutes at 190C.

LITTLE CHEF'S HATS & APRONS


Here are my girls' chef hats & aprons that I completed just before Miss 0 was born. The girls wanted aprons to wear while cooking with me, and I just couldn't resist these hats http://www.michaelmillerfabrics.com/Blog/Chef_Hat.pdf
There is a free apron pattern there also or you can do what I did & make your own.
Each one has a contrasting band to match their apron so there are no arguments. Not difficult to make, although time-consuming when you have to make three!!!